The labor expenses may be entered and allocated in the Expense Entry and Allocation screen. The labor expenses entered are recorded as extra charges on the Labor Details screen. After the labor expenses are allocated, the record appears on the Allocate Labor screen. Refer to Allocate Labor Hours for more information on allocating labor hours. If the selected labor resource has no hours to allocate, the labor expenses are now available for the acceptance. Refer to Accept Labor Hours and Costs for more information on accepting allocated labor hours and costs.
Hover a mouse pointer over the Allocations menu link to display its drop-down menu.
Slide a mouse pointer over to the Allocations to display its menu.
Click Labor Expense Entry to open the Expense Entry and Allocation screen.
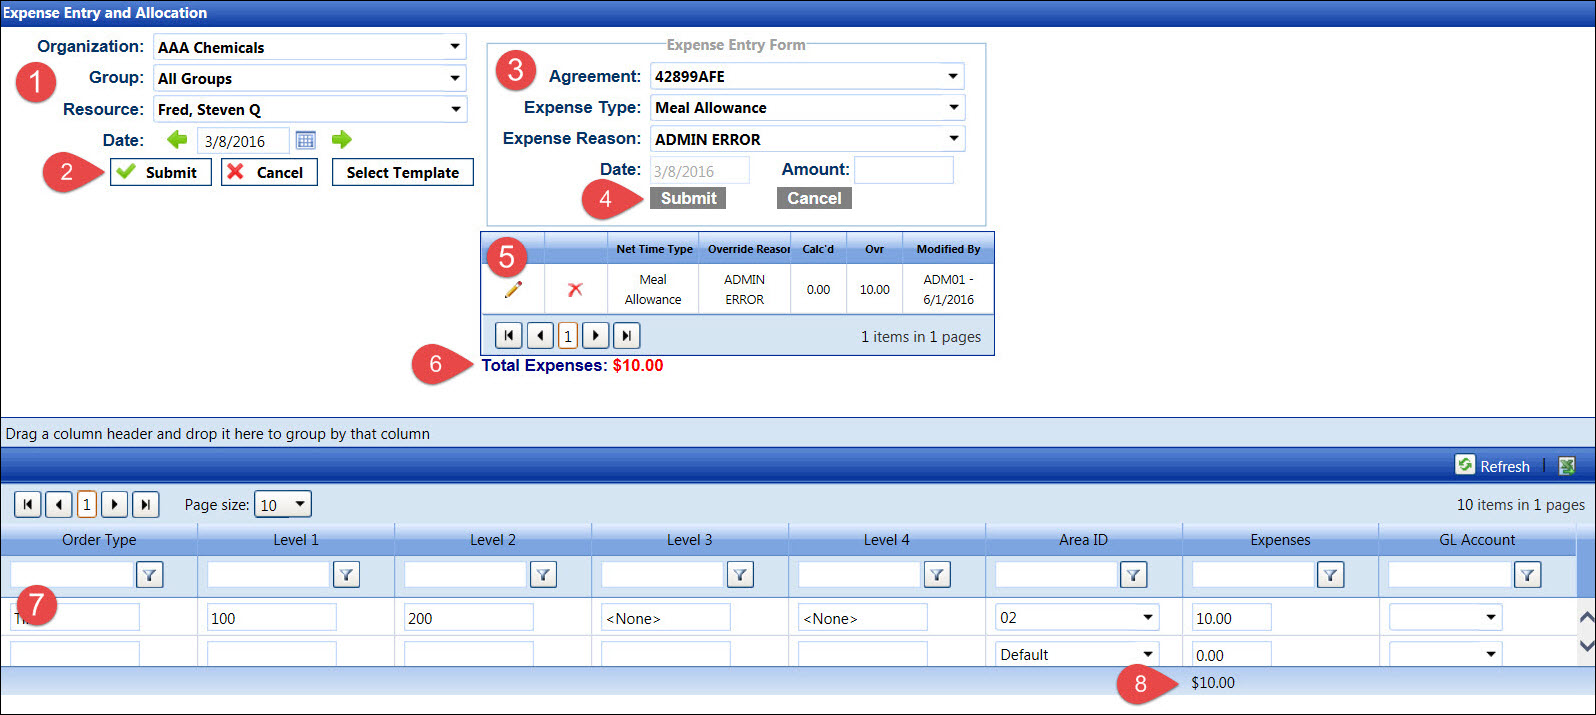
Selected organization, group, and labor resource name are displayed. Click each drop-down list to make the changes.
Click this Submit button is to allocate the labor expenses.
The Expense Entry Form is similar to the one on the Labor Details screen.
Click this Submit button to add the labor expenses.
After the labor expenses are entered and submitted, the records appear in the grid.
This sum of the labor expenses is displayed as Total Expenses.
After the labor expenses are entered, they are ready for allocations which is completed in the grid.
The total allocated labor expenses is displayed.
From the Expense Entry and Allocation screen, select an organization from the Organization drop-down list to display its groups in the Groups drop-down list.
The All Groups option in the Group drop-down list is selected by default. Select a specific group from the Group drop-down list. Otherwise, proceed to the next step.
Select a labor resource from the Resource drop-down list.
Enter the date for labor expenses entry into the Date text box. Alternatively, click the double arrows icon to move a date forward or backward one day or select a date from the calendar. (see also Date Format)
From the Expense Entry Form, select an agreement from the Agreement drop-down list to display its expense type names in the Expense Type drop-down list.
Select an expense type name from the Expense Type drop-down list to display the expense reasons in the Expense Reason drop-down list.
Select an expense reason from the Expense Reason drop-down list.
The Date text box is read-only, displaying the selected date. Go back to step 4 to change the date.
Enter the expense amount into the Amount text box.
Click Submit to save and display the labor expense entry in the grid.
Repeat the steps to enter additional labor expenses.
From the Expense Entry Form, click the Edit icon on a line item to enable the Ovr text box.
Enter a new expense amount in the Ovr text box.
Click the Update icon to save and display the modified expense amount in the grid.
From the Expense Entry Form, click the Delete icon on a line item. The pop-up message appears.
Click OK to delete the selected labor expense.
After the labor expense entries are completed, follow these steps to allocate the expenses.
From the grid located on the Expense Entry and Allocation screen, enter the order type into the Order Type text box and the Levels information into the Level 1, 2, 3, or 4 text boxes where applicable.
The Default options in the Area ID drop-down list is selected by default. Select an area ID from the Area ID drop-down list. Otherwise, proceed to the next step.
Enter the labor expense amount into the Expenses text box.
Select a GL account from the GL Account drop-down list, if applicable.
Repeat the steps to allocate the labor expense to a different cost objects. Then proceed to the next step.
Click the Submit button to allocate the labor expenses. The total allocated labor expenses is displayed.
Related Topics